I just completed to install my dockstar in a waterproof housing with a copper cooler and external access to one USB port.


Summary of the hardware that I own or at least owned for some time with some special focus on technical details and photos
I just completed to install my dockstar in a waterproof housing with a copper cooler and external access to one USB port.
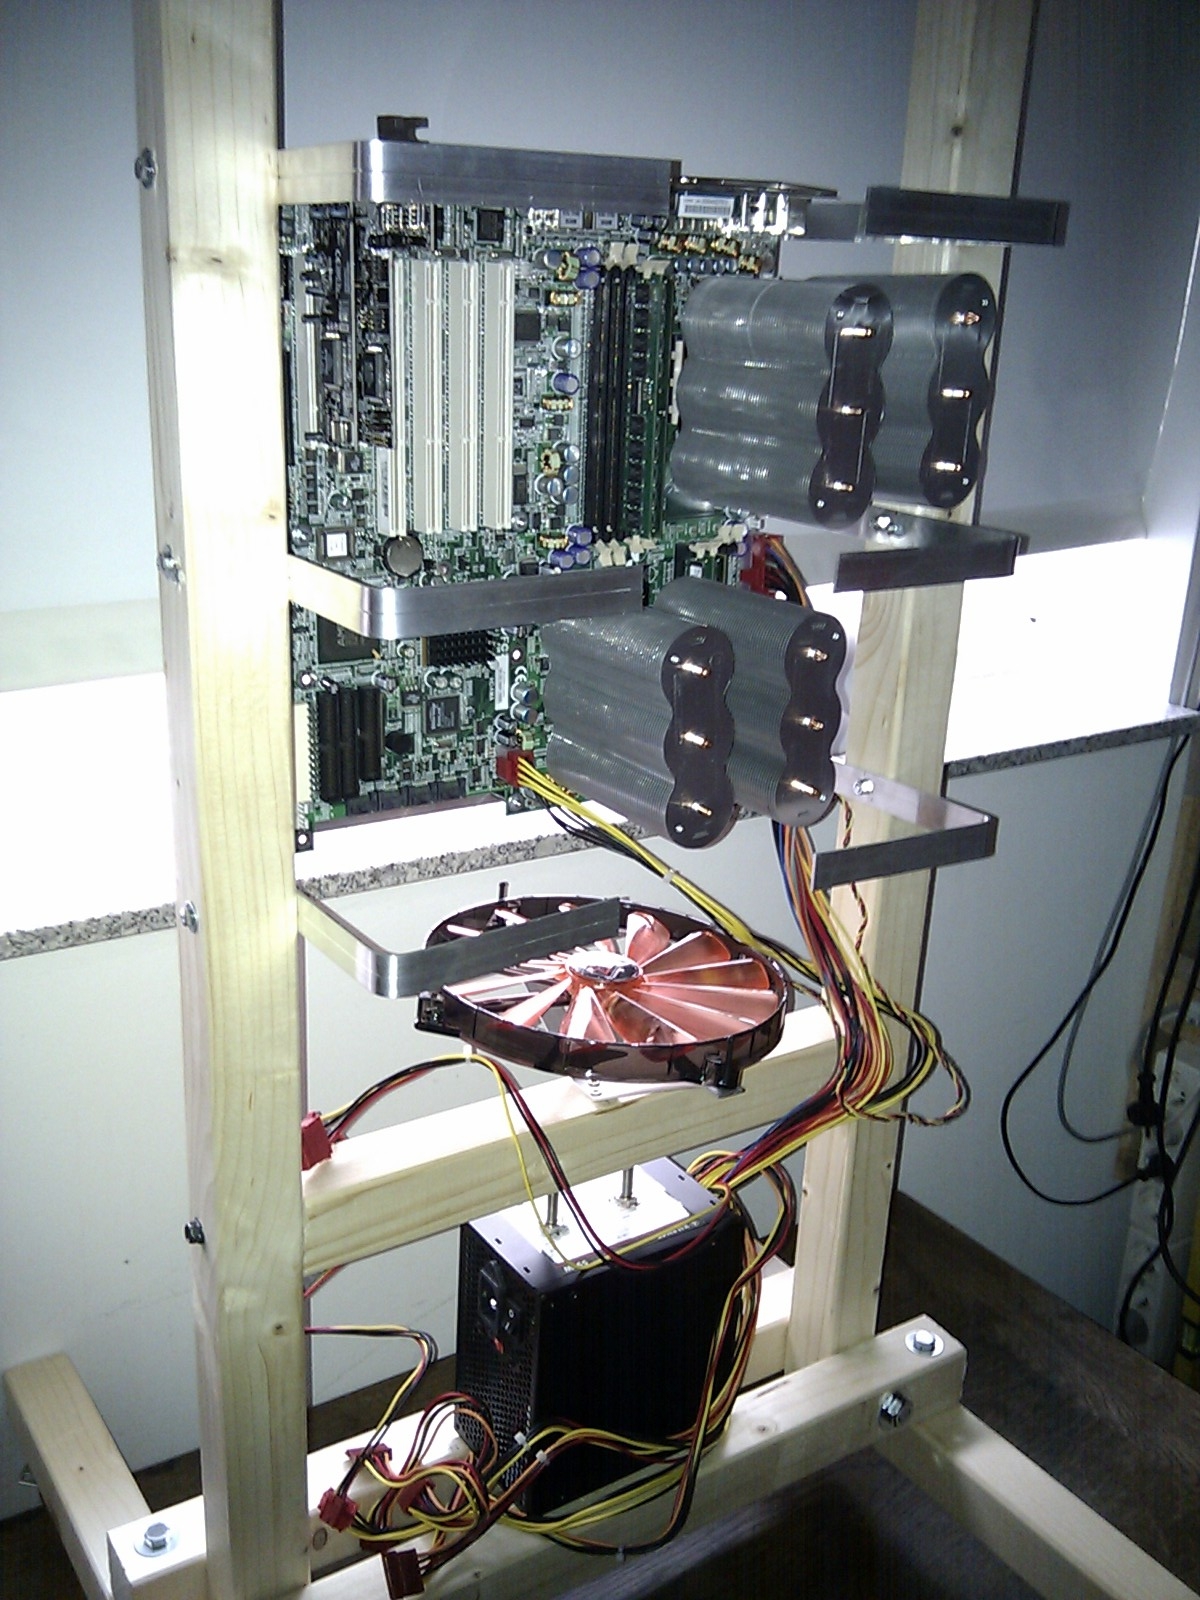
Because of some double boughts from ebay I owned a server board and some peripherials and decided to build a new desktop computer with minimum noise and highest performance I can get at no costs. So I build an open housing for the computer and used passive coolers with only one active fan. The complete system is restrained between two wooden bars and two 17″ LCD monitors on top.
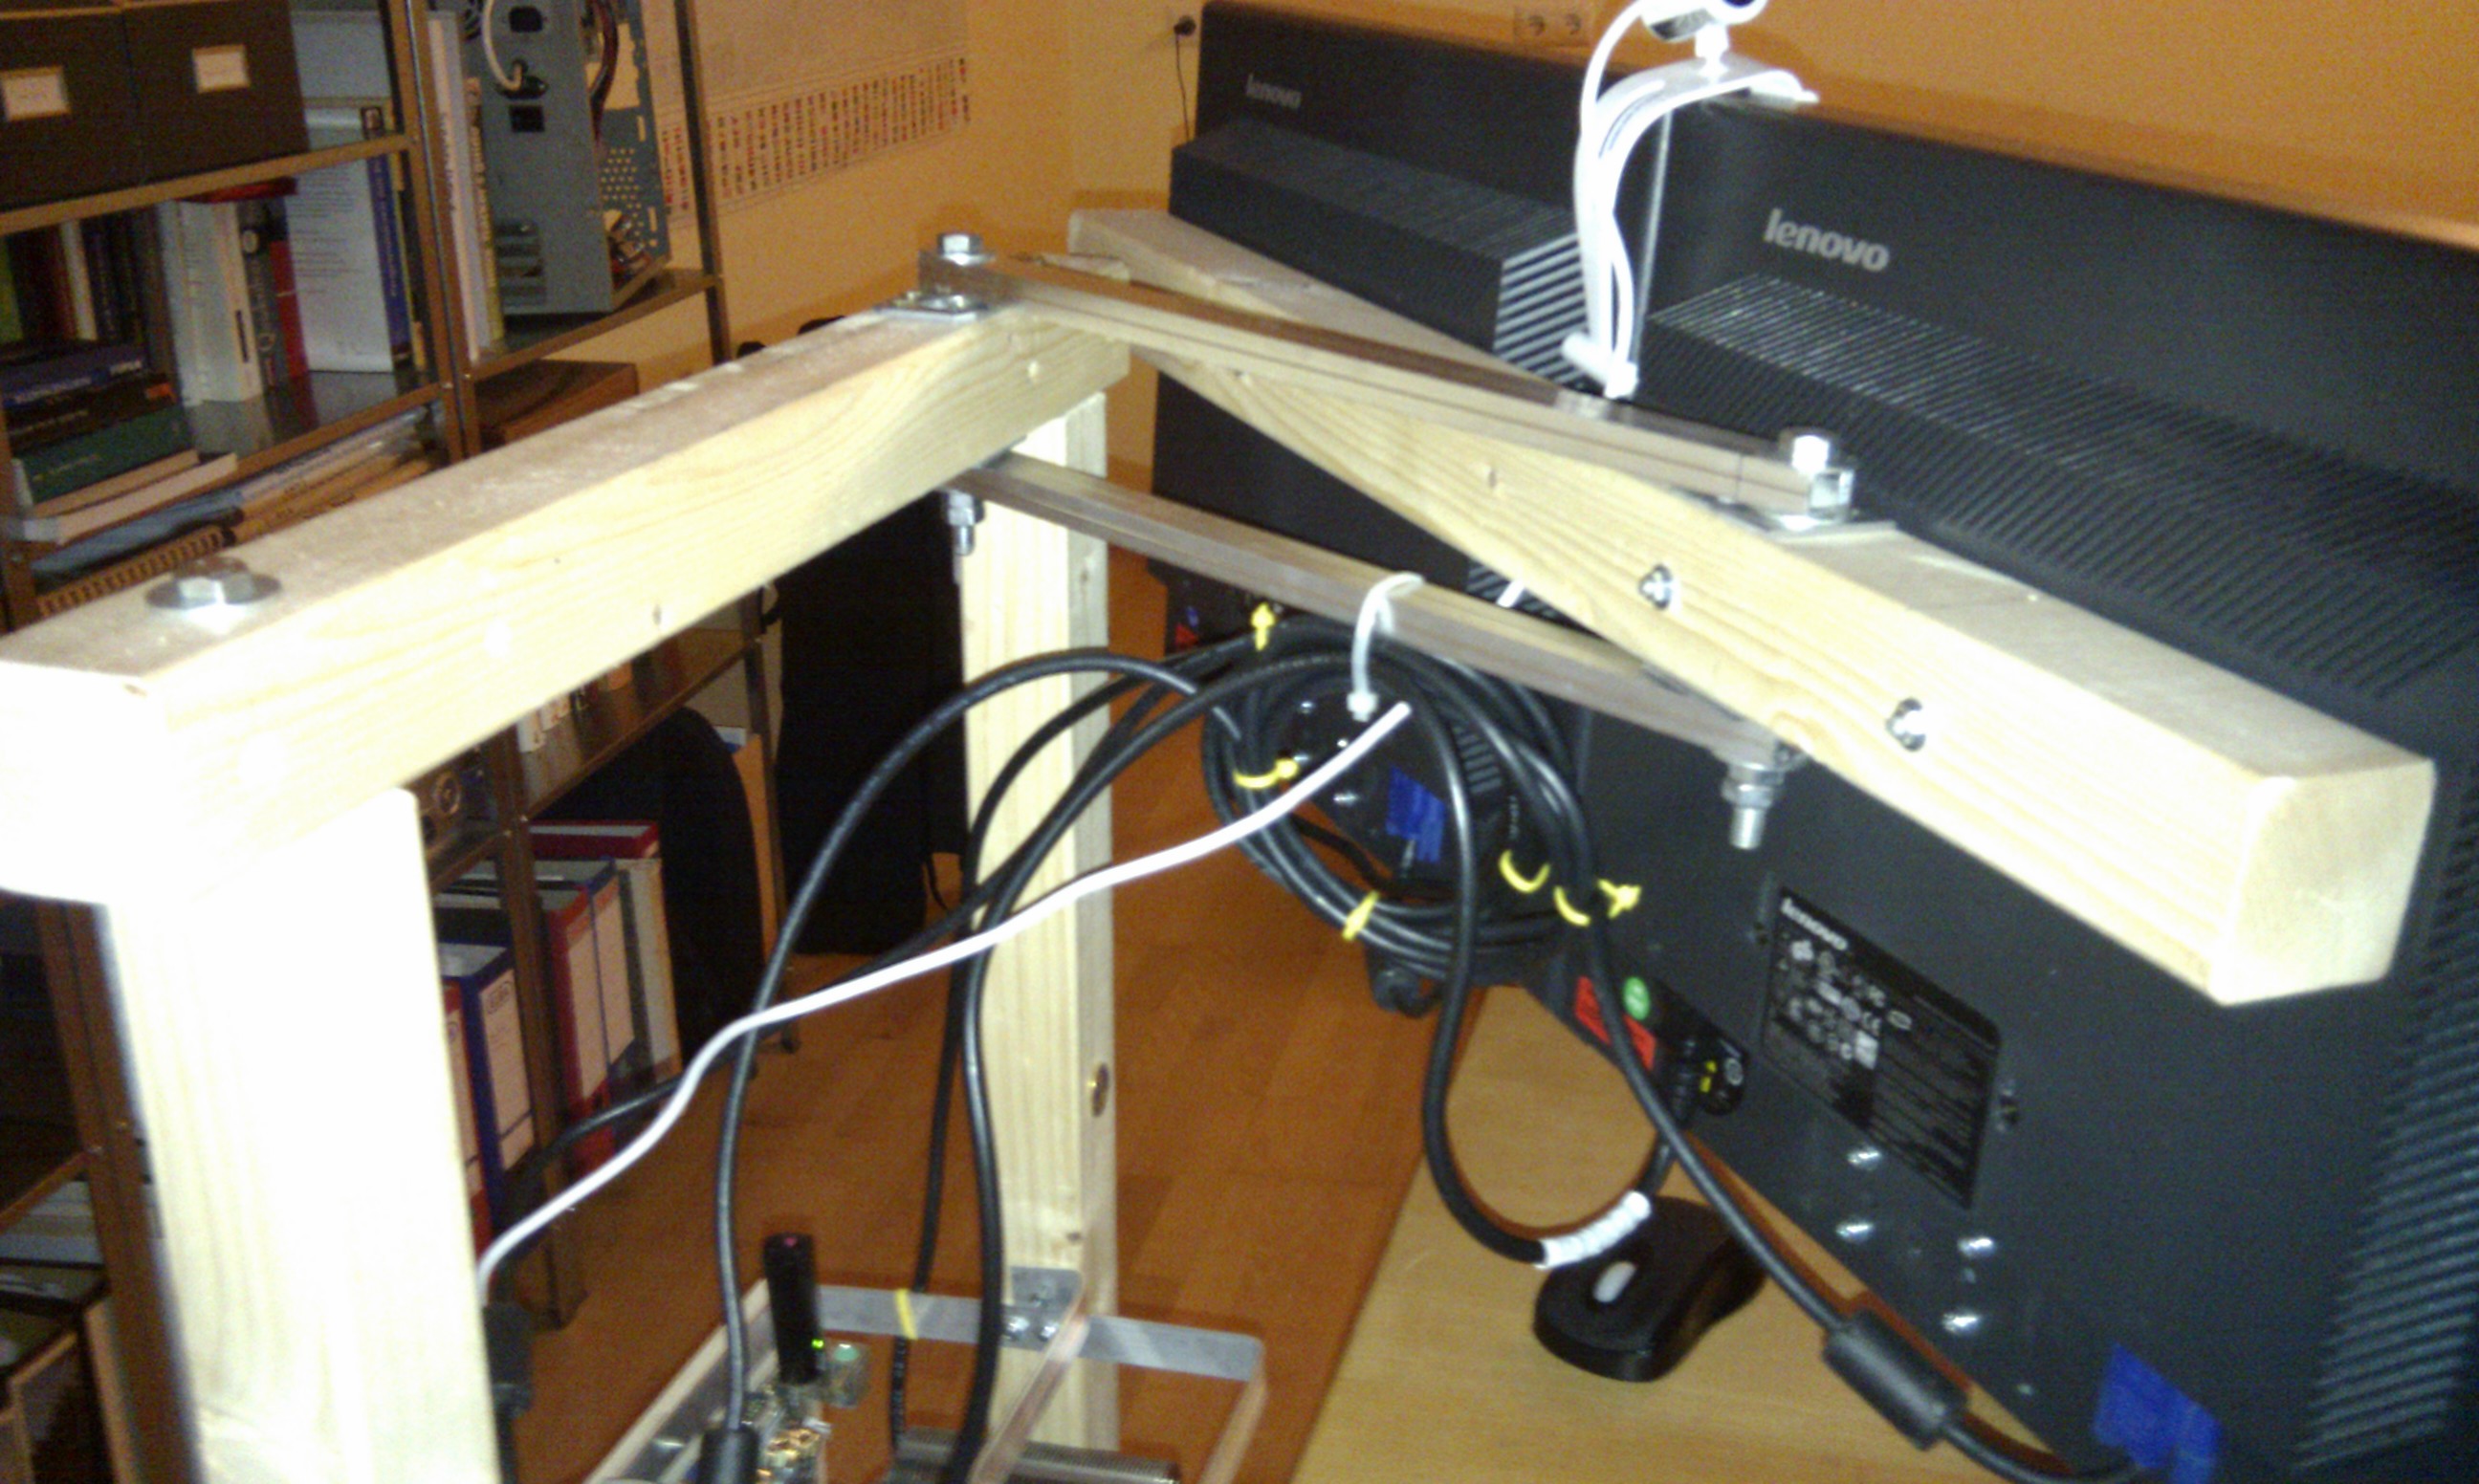
As one of my previous LCDs just stopped working I spent some money on a used replacement and found two Lenovo Flatpanels which are now included in my setup. With the replacement I also introduced a rotating screen carrier. Now the computer is located beside and at the edge of my desktop and the screens may be rotated into sight.
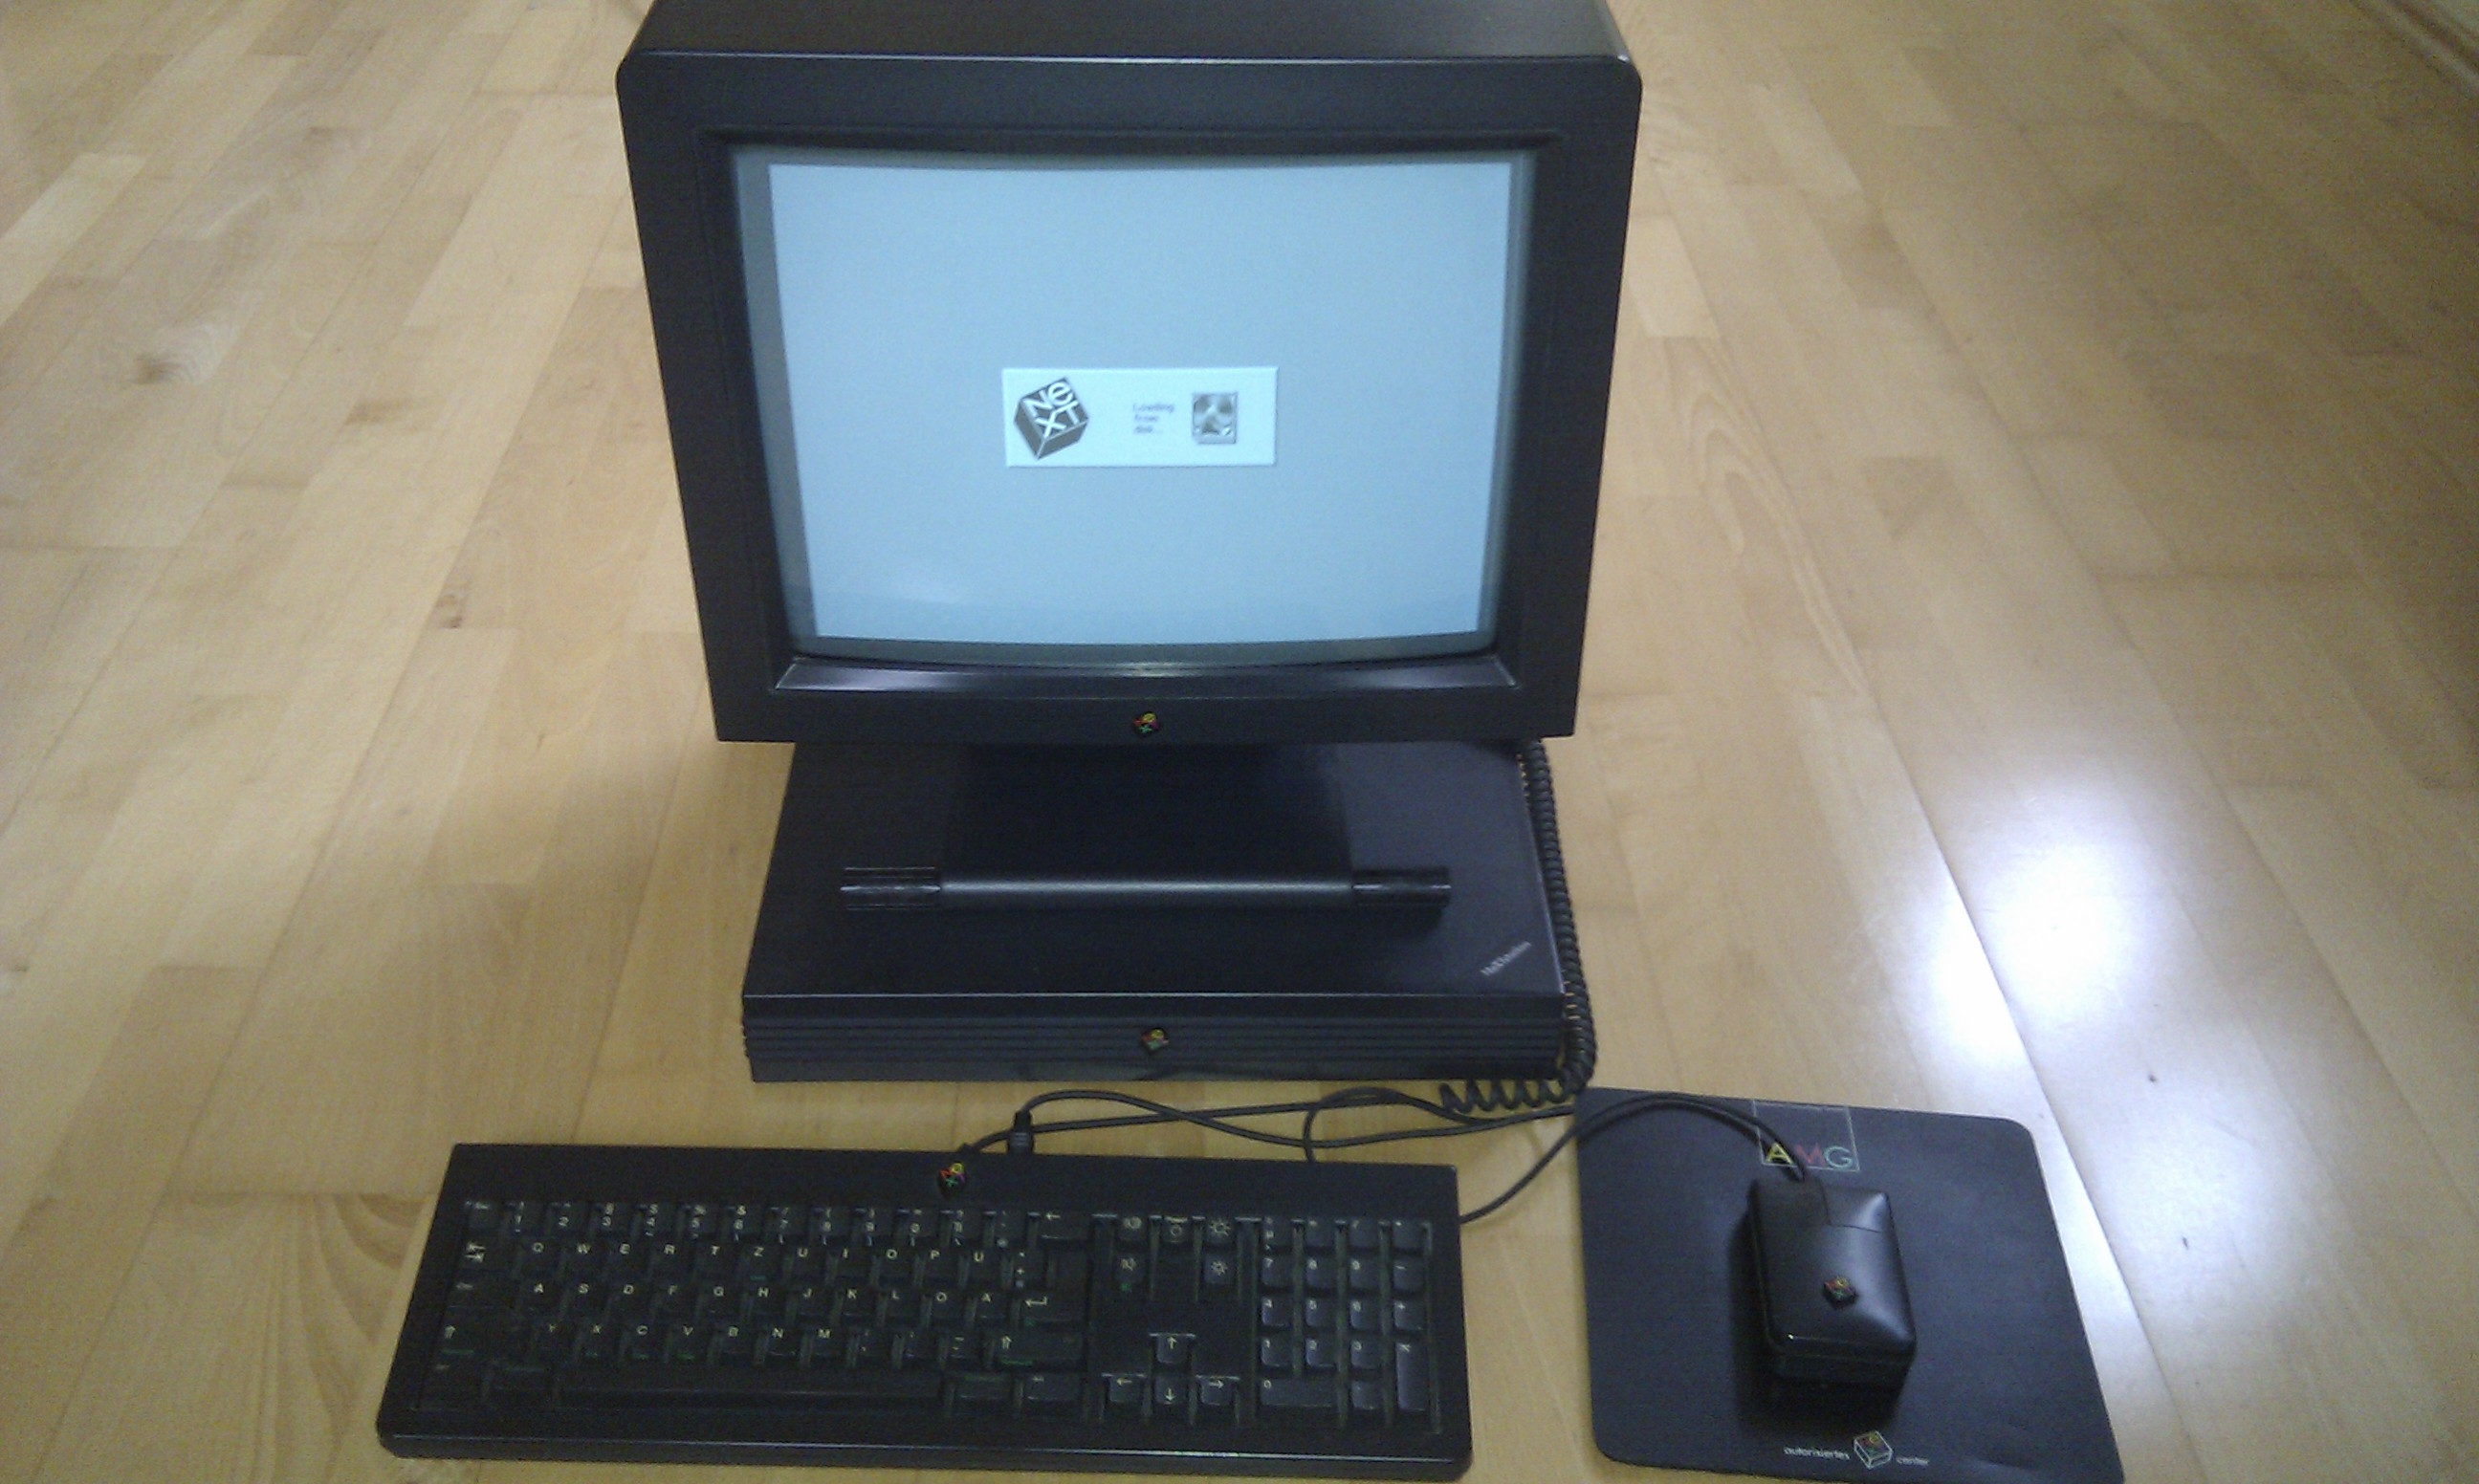
For some time I owned a Next Station Mono. But due to the unavailability of enough time to play around with it I decided to find a new home for it. But I decided to keep some photos in order to show them around.

I copied the installation instructions and files from the wonderful website of Jeff Doozan who made an excellent job at:
http://jeff.doozan.com/debian/uboot/
by copying the installation script and executying.
cd /tmp
wget http://jeff.doozan.com/debian/uboot/install_uboot_mtd0.sh
chmod +x install_uboot_mtd0.sh
./install_uboot_mtd0.sh
I just followed the instructions from http://jeff.doozan.com/debian/ by copying his installation script to a local tmp directory:
cd /tmp
wget http://jeff.doozan.com/debian/dockstar.debian-squeeze.sh
chmod +x dockstar.debian-squeeze.sh
export PATH=$PATH:/usr/sbin:/sbin
./dockstar.debian-squeeze.sh
after this the system is gathering stuff from the internet and is installing it on the attached USB stick. And it succeeded with a newly running debian squeeeze on my dockstar
-bash-3.2# cd /tmp/
-bash-3.2# wget http://jeff.doozan.com/debian/uboot/install_uboot_mtd0.sh
Connecting to jeff.doozan.com (69.163.187.226:80)
wget: cannot connect to remote host (69.163.187.226): Network is unreachable
-bash-3.2# route add default gw 192.168.4.250
-bash: route: command not found
-bash-3.2# /sbin/route add default gw 192.168.4.250
-bash-3.2# wget http://jeff.doozan.com/debian/uboot/install_uboot_mtd0.sh
Connecting to jeff.doozan.com (69.163.187.226:80)
install_uboot_mtd0.s 100% |******************************************************************************************************************************************| 15859 00:00:00 ETA
-bash-3.2# ls
install_uboot_mtd0.sh resolv.conf var
-bash-3.2# chmod +x install_uboot_mtd0.sh
-bash-3.2# ./install_uboot_mtd0.sh
!!!!!! DANGER DANGER DANGER DANGER DANGER DANGER !!!!!!
If you lose power to your device while running this script,
it could be left in an unusable state.
This script will replace the bootloader on /dev/mtd0.
This installer will only work on a Seagate Dockstar or Pogoplug Pink.
Do not run this installer on any other device.
By typing ok, you agree to assume all liabilities and risks
associated with running this installer.
If you agree, type ‘ok’ and press ENTER to continue: ok
DISABLE POGOPLUG SERVICES
The pogoplug service includes an auto-update feature which could
be used to cripple or disable your device. It is recommended
that you disable this service.
NOTE: The pogoplug service is proprietary software
created by Cloud Engines. It is not available for use
in other distributions and will not be available in
your new linux installation even if you choose not to disable it.
Would you like to disable the pogoplug services? [Y/n] Y
Applying fixes to the pogoplug environment…
Disabling the pogoplug service…
Done fixing pogoplug environment.
# checking for /uboot-original-mtd0.kwb…
# Installing /uboot-original-mtd0.kwb…
Connecting to jeff.doozan.com (69.163.187.226:80)
uboot-original-mtd0. 100% |******************************************************************************************************************************************| 49 –:–:– ETA
Connecting to jeff.doozan.com (69.163.187.226:80)
uboot-original-mtd0. 100% |******************************************************************************************************************************************| 512k 00:00:00 ETA
# Successfully installed /uboot-original-mtd0.kwb.
# checking for /usr/sbin/blparam…
# Installing /usr/sbin/blparam…
Connecting to jeff.doozan.com (69.163.187.226:80)
blparam.md5 100% |******************************************************************************************************************************************| 42 –:–:– ETA
Connecting to jeff.doozan.com (69.163.187.226:80)
blparam 100% |******************************************************************************************************************************************| 14168 00:00:00 ETA
# Successfully installed /usr/sbin/blparam.
# checking for /usr/sbin/nandwrite…
# Installing /usr/sbin/nandwrite…
Connecting to jeff.doozan.com (69.163.187.226:80)
nandwrite.md5 100% |******************************************************************************************************************************************| 44 –:–:– ETA
Connecting to jeff.doozan.com (69.163.187.226:80)
nandwrite 100% |******************************************************************************************************************************************| 11500 –:–:– ETA
# Successfully installed /usr/sbin/nandwrite.
# checking for /usr/sbin/nanddump…
# Installing /usr/sbin/nanddump…
Connecting to jeff.doozan.com (69.163.187.226:80)
nanddump.md5 100% |******************************************************************************************************************************************| 43 –:–:– ETA
Connecting to jeff.doozan.com (69.163.187.226:80)
nanddump 100% |******************************************************************************************************************************************| 21286 –:–:– ETA
# Successfully installed /usr/sbin/nanddump.
# checking for /usr/sbin/flash_erase…
# Installing /usr/sbin/flash_erase…
Connecting to jeff.doozan.com (69.163.187.226:80)
flash_erase.md5 100% |******************************************************************************************************************************************| 46 –:–:– ETA
Connecting to jeff.doozan.com (69.163.187.226:80)
flash_erase 100% |******************************************************************************************************************************************| 12819 –:–:– ETA
# Successfully installed /usr/sbin/flash_erase.
# checking for /usr/sbin/fw_printenv…
# Installing /usr/sbin/fw_printenv…
Connecting to jeff.doozan.com (69.163.187.226:80)
fw_printenv.md5 100% |******************************************************************************************************************************************| 46 –:–:– ETA
Connecting to jeff.doozan.com (69.163.187.226:80)
fw_printenv 100% |******************************************************************************************************************************************| 652k 00:00:00 ETA
# Successfully installed /usr/sbin/fw_printenv.
# checking for /etc/fw_env.config…
# Installing /etc/fw_env.config…
Connecting to jeff.doozan.com (69.163.187.226:80)
fw_env.config.md5 100% |******************************************************************************************************************************************| 48 –:–:– ETA
Connecting to jeff.doozan.com (69.163.187.226:80)
fw_env.config 100% |******************************************************************************************************************************************| 329 –:–:– ETA
# Successfully installed /etc/fw_env.config.
# Attempting to auto-detect your device…Dockstar detected
# Installing uBoot
Connecting to jeff.doozan.com (69.163.187.226:80)
uboot.mtd0.kwb.md5 100% |******************************************************************************************************************************************| 49 –:–:– ETA
Connecting to jeff.doozan.com (69.163.187.226:80)
uboot.mtd0.kwb 100% |******************************************************************************************************************************************| 512k 00:00:00 ETA
Erase Total 4 Units
Performing Flash Erase of length 131072 at offset 0x60000 done
Writing data to block 0 at offset 0x0
Writing data to block 1 at offset 0x20000
Writing data to block 2 at offset 0x40000
Writing data to block 3 at offset 0x60000
Block size 131072, page size 2048, OOB size 64
Dumping data starting at 0x00000000 and ending at 0x00080000…
## Verifying new uBoot…
Connecting to jeff.doozan.com (69.163.187.226:80)
uboot.mtd0.kwb.md5 100% |******************************************************************************************************************************************| 49 –:–:– ETA
# Verified successfully!
# Installing uBoot environment
Warning: Bad CRC, using default environment
## Error: “ethaddr” not defined
Warning: Bad CRC, using default environment
## Error: “rescue_installed” not defined
Warning: Bad CRC, using default environment
## Error: “bootcmd_rescue” not defined
Warning: Bad CRC, using default environment
## Error: “rescue_custom_params” not defined
Warning: Bad CRC, using default environment
## Error: “usb_custom_params” not defined
Warning: Bad CRC, using default environment
## Error: “ubifs_custom_params” not defined
Connecting to jeff.doozan.com (69.163.187.226:80)
uboot.environment.md 100% |******************************************************************************************************************************************| 52 –:–:– ETA
Connecting to jeff.doozan.com (69.163.187.226:80)
uboot.environment 100% |******************************************************************************************************************************************| 128k 00:00:00 ETA
Erase Total 1 Units
Performing Flash Erase of length 131072 at offset 0xc0000 done
Writing data to block 6 at offset 0xc0000
# Verifying uBoot environment
ECC failed: 6
ECC corrected: 0
Number of bad blocks: 0
Number of bbt blocks: 0
Block size 131072, page size 2048, OOB size 64
Dumping data starting at 0x000c0000 and ending at 0x000e0000…
Connecting to jeff.doozan.com (69.163.187.226:80)
uboot.environment.md 100% |******************************************************************************************************************************************| 52 –:–:– ETA
# uBoot installation has completed successfully.
-bash-3.2# /usr/bin/f
fdformat find flash_eraseall fold free ftpget ftpput fuser
-bash-3.2# /usr/sbin/fw_
fw_printenv fw_setenv
-bash-3.2# /usr/sbin/fw_printenv
ethact=egiga0
bootdelay=3
baudrate=115200
arcNumber=2097
mainlineLinux=yes
console=ttyS0,115200
led_init=green blinking
led_exit=green off
led_error=orange blinking
mtdparts=mtdparts=orion_nand:1M(u-boot),4M(uImage),32M(rootfs),-(data)
mtdids=nand0=orion_nand
partition=nand0,2
stdin=serial
stdout=serial
stderr=serial
rescue_installed=0
rescue_set_bootargs=setenv bootargs console=$console ubi.mtd=2 root=ubi0:rootfs ro rootfstype=ubifs $mtdparts $rescue_custom_params
rescue_bootcmd=if test $rescue_installed -eq 1; then run rescue_set_bootargs; nand read.e 0x800000 0x100000 0x400000; bootm 0x800000; else run pogo_bootcmd; fi
pogo_bootcmd=if fsload uboot-original-mtd0.kwb; then go 0x800200; fi
force_rescue=0
force_rescue_bootcmd=if test $force_rescue -eq 1 || ext2load usb 0:1 0x1700000 /rescueme 1 || fatload usb 0:1 0x1700000 /rescueme.txt 1; then run rescue_bootcmd; fi
ubifs_mtd=3
ubifs_set_bootargs=setenv bootargs console=$console ubi.mtd=$ubifs_mtd root=ubi0:rootfs rootfstype=ubifs $mtdparts $ubifs_custom_params
ubifs_bootcmd=run ubifs_set_bootargs; if ubi part data && ubifsmount rootfs && ubifsload 0x800000 /boot/uImage && ubifsload 0x1100000 /boot/uInitrd; then bootm 0x800000 0x1100000; fi
usb_scan=usb_scan_done=0;for scan in $usb_scan_list; do run usb_scan_$scan; if test $usb_scan_done -eq 0 && ext2load usb $usb 0x800000 /boot/uImage 1; then usb_scan_done=1; echo “Found bootable drive on usb $usb”; setenv usb_device $usb; setenv usb_root /dev/$dev; fi; done
usb_scan_list=1 2 3 4
usb_scan_1=usb=0:1 dev=sda1
usb_scan_2=usb=1:1 dev=sdb1
usb_scan_3=usb=2:1 dev=sdc1
usb_scan_4=usb=3:1 dev=sdd1
usb_init=run usb_scan
usb_device=0:1
usb_root=/dev/sda1
usb_rootfstype=ext2
usb_rootdelay=10
usb_set_bootargs=setenv bootargs console=$console root=$usb_root rootdelay=$usb_rootdelay rootfstype=$usb_rootfstype $mtdparts $usb_custom_params
usb_bootcmd=run usb_init; run usb_set_bootargs; run usb_boot
usb_boot=mw 0x800000 0 1; ext2load usb $usb_device 0x800000 /boot/uImage; if ext2load usb $usb_device 0x1100000 /boot/uInitrd; then bootm 0x800000 0x1100000; else bootm 0x800000; fi
bootcmd=usb start; run force_rescue_bootcmd; run ubifs_bootcmd; run usb_bootcmd; usb stop; run rescue_bootcmd; run pogo_bootcmd; reset
ethaddr=00:10:75:1A:D3:B0
GoldCard Tool v0.0.5
Requirements:
* Latest HTC Sync software installed (www.htc.com)
* Spare microSD card
* Windows PC (Tested on Windows7 x64,Vista x86)
* .Net Framework 2.0
Step by step instructions:
* Format the microSD card to FAT32 format.
* Put the microSD card in your device and boot it.
* Launch GoldCard Tool (Right Click and run as Admin if needed)
* Connect Android device to USB (USB Debugging must be enabled on the device)
* Click ‘Get CID’ (If MMC1 fails try MMC0)
* Click the link to open revskills.de, enter the CID number from Goldcard Tool and create your goldcard image, which will be e-mailed to you.
* Enable USB Mass Storage on the device.
* Click ‘Refresh’ and select your microSD card in the drop down menu.
* Click ‘Load GoldCard.img’ and open the .img file you got by email.
* Click ‘Patch MMC’
You now have a goldcard!
[Notes]
HTC Sync is required for drivers only
Android SDK is not required
After a couple of requests I have decided to release the source code.
http://android.modaco.com/content/software/308798/pc-application-goldcardtool/
Guide to root using Windows, MAC OS X and Linux
1. !Some people reported that this method needs to have GoldCard(in most cases you won’t need it) even if you have unbranded device, more here
2. You need to have Android SDK and HTC Sync installed(for Windows users)
3. Download following items:
—- If you have a bootloader version 0.75.xxxx or below AND a current ROM of 1.15.xxx.x or below – DOWNLOAD / MIRROR
—- If you have a bootloader version 0.80.xxxx or below AND a current ROM of 1.21.xxx.x or below – DOWNLOAD / MIRROR
4. Unzip the file you downloaded to a directory, then open a command prompt / terminal window at that directory.
5. Turn off your HTC Desire, then turn it back on with the ‘back’ button held down. You’ll see ‘FASTBOOT’ written on the screen in a red box. Connect the phone to the computer.
6. In the command prompt/terminal window, enter either ‘step1-windows.bat'(for windows), ‘./step1-mac.sh'(for mac) or ‘./step1-linux.sh'(for linux)
7. Navigate to the ‘BOOTLOADER’ and then ‘RECOVERY’ option on the menu, using the volume buttons to move and the power button to select.
8. In the command prompt/terminal window, enter either ‘step2-windows.bat’, ‘./step2-mac.sh’ or ‘./step2-linux.sh’ as appropriate.
9. When this has completed, your device should be at the ‘recovery'(“green”) screen. Select Wipe and then press Wipe data/factory reset
10. Once complete you should be back in the main menu. Now select the option Flash zip from sdcard and than choose rootedupdate.zip
11. Once back in the main menu, choose restart the phone – the rooting process is now finished
How to flash ROM
1. Download this
2. Turn off Desire and then turn it on while holding back button to enter bootloader(white screen)
3. Once in “white screen” press power button again to enter bootloader
4. Connect Desire with PC
5. Press Volume Down and than Power to enter Recovery
6. Now the red triangle should show up, go to folder you downloaded file and press recovery-windows.bat, recovery-mac.sh or recovery-linux.sh depending on which OS you have
7. Now you are in recovery mode (green screen), press Wipe and than Wipe data/clear storage, than press optical tracker to confirm it
8. After that press Volume Down to go back to main menu in recovery
9. Navigate to Flash zip from sdcard using optical tracker, select .zip confirm it and wait until process finish, after that press Reboot system and unplug you Desire
10. Enjoy your new ROM
FAQs:
Bootloop? – Re flash making sure you fully wipe
Video causing restart – Flash latest radio
Grainy Camera – Try it without you back cover on not a rom issue. See attached photo (where i dont have the plactic lens cover on my case anymore, using Camera360 for HDR effect
SD card read only – mount in windows and chkdsk
Internal Memory – it does reduce slightly even with A2SD+. you will have 139mb on boot
Wireless N – is not in this rom
SetCPU – you need to buy the app. IT is not included
Recovery – Enter android recovery > apply update.zip and that will take you to clockwork recovery
Not booting – allow the phone time to boot after flashing. Sometimes it can take 5 mins. Also dont restore system settings using Titanium. It can cause faults
Flashing!
* Use either Amon RA or clockworkmod Recovery < also available via rom manager from the market. * if you want A2SD+ Ensure your SD Card is Partitioned with FAT32 & an EXT3 partition * Nandroid Backup * Full wipe Only required if coming from a non Froyo rom (but always recommended) * Flash Rom (you may need to toggle signature verifacation) * Flash Radio (unless you already have it) * If you already have an EXT3 partition you will be ready for the A2SD+ version * FroYo Apps2SD implementation does not utilize the EXT3 partition * Reboot (this may take a 5-10 mins on the initial boot) * Optional: Install any Addins + Customizations after first boot A2SD+ * Moves apps & Dalvik cahche to your SD card * Lots of free internal memory! * You will be required to format you SD card with 2 partitions as laid out below Partitioning your SD Card ready for A2SD+ * Backup all data on you SD card (this will be wiped) * The card should be formatted with your standard FAT32 partition 1st followed by an EXT3 partition (I would recommend 512mb, EXT4 is also supported but may shorten the life of you SD card) * Linux users use GParted or a similar software. * For everyone else I would recommend using Rom Manager * Once you have downloaded rom manager from the market, open the app and click partition SD Card, Select your EXT size and set 0mb for swap * Restore your data to your SD and the job is done. FroYo A2SD * Moves apps to your Fat32 partition (SD) * No EXT partition is required * Use "Mod Install Location" (included) to change you default install location. * please note, not all applications support direct install to your SD, you can install these and then move them via Sttings > Applications > Manage Applications
Possible issues and solutions
* Maps does not show as installed in the market > go to Setting > Applications > all > and clear data & cache in market.
* I Cant update some of the preinstalled apps even though they are in /data Remove them via Settings > applications, then install them from the market.
* No mobile internet > go to Wireless & Networks > Mobile Networks > APN then clear defaults, if your settings dont install just enter them manually
* I cant see some of the applications that come with the rom >If these are supposed to be included in the rom but do not show up, Try a full wipe
* I have lost my clockwork recovery update.zip from my sd > Here it is,just drop it on your SD.
LeeDroid Home http://leedroid.protogenlabs.com/
Just add your own server in the foxmarks configuration under expert settings and please remember to define a file rather than a directory in order for foxmarks to synchronize with.
The first shot may fail so please synchronize your bookmarks twice or more times seperate by a firefox reboot.